How Syringes and Needles Are Assembled by Machine
How a disposable syringe, an injection needle and a catheter connector are put together on assembly machines, step by step, with the medical machines we supply.
Video 1: a syringe assembly machine. What you will see: several rotary turrets turn together, and assembled syringes slide down the outfeed chute.
Watch: how syringes and needles are assembled by machine, step by step

Video transcript
This video shows how a disposable syringe and an injection needle are put together on the assembly machines we supply, step by step. A disposable syringe has three parts: a barrel, a plunger rod and a rubber stopper. A two-part syringe has two. An injection needle has three parts: a plastic hub, a steel cannula and a protective cap.
Syringe, step by step. Step one: feed the parts. Feeders bring the parts into the machine: a vibratory bowl on one side and an elevator hopper on the other. Step two: turn the turrets together. Several rotary turrets work together and carry the parts through the stations. The machine can handle standard, Luer-lock, two-part and eccentric-tip syringes. Step three: put the parts together. The rubber stopper is fitted to the plunger rod, and the plunger is then inserted into the barrel. A two-part syringe has no separate stopper step. Step four: slide out. Finished syringes slide out along the outfeed chute. A typical machine runs about 10,000 syringes per hour, faster for small syringes and slower for large sizes.
Needle, step by step. The needle machine is a different machine: every needle goes through glue, UV curing and a check. Step one: feed the parts. Feeders bring in the hub, the steel cannula and the protective cap. Step two: move station by station. The parts move from station to station on a rotary table, and each station does one job on the needle. Step three: insert the cannula. The steel cannula is placed into the hub. Step four: dispense the glue. Glue goes on where the cannula meets the hub. It is a UV-curing adhesive, and it is what holds the steel cannula in the plastic hub. Step five: cure it under UV light. The glued joint is cured under UV light. Here, it glows purple under the lamp. Step six: check each needle. Each finished needle is checked in a fixture. Step seven: fit the protective cap. The protective cap goes on the finished needle. The needle machine runs about 900–1,000 needles per hour. It does a different job from the syringe machine, so the two speeds should not be compared.
To recap. The syringe: feed the parts, turn the turrets together, put the parts together, slide out. The needle: feed the parts, move station by station, insert the cannula, dispense the glue, cure it under UV light, check each needle, fit the protective cap.
On the catheter connector machine, the connectors go through a rotary table at 60–80 a minute, two at a time. Every machine is set up for your own parts. To quote, we need drawings or photos of each part and of the assembled product, how the parts are joined, what each piece needs to be checked for, and your target output. We'll tell you whether it can be assembled and how fast, and send an exact quote within 24–48 hours.
What is syringe assembly? Syringe assembly is the process of putting a disposable syringe together from its separate parts: a three-part syringe has a barrel, a plunger and a rubber gasket, and a two-part syringe has two. An injection needle is assembled from three parts: a plastic hub, a steel cannula and a protective cap. Machines feed the parts and put them together station by station; on the needle machine, each finished needle is also checked in a fixture.
Key takeaways
- Syringes and needles are assembled on two different machines, so their speeds are not comparable: the syringe machine puts a syringe together on rotary turrets at about 10,000 per hour, while the needle machine, which adds glue, UV curing and a check for every needle, runs about 900–1,000 per hour.
- The syringe machine handles standard, Luer-lock, two-part and eccentric-tip syringes.
- An injection needle is built from a plastic hub, a steel cannula and a protective cap, joined with glue (a UV-curing adhesive).
- Catheter connectors go through a rotary table at 60–80 a minute, two at a time, and medical tube tips are formed by heat, six tubes at a time.
- A cleanroom line built around a vertical rotary disc and a pin chain conveyor, with stainless steel stations, is also available. Every machine is set up for your own parts, and a full syringe line, with moulds, moulding machines, printing, assembly and packing, can be planned with you.
The parts of a syringe and a needle
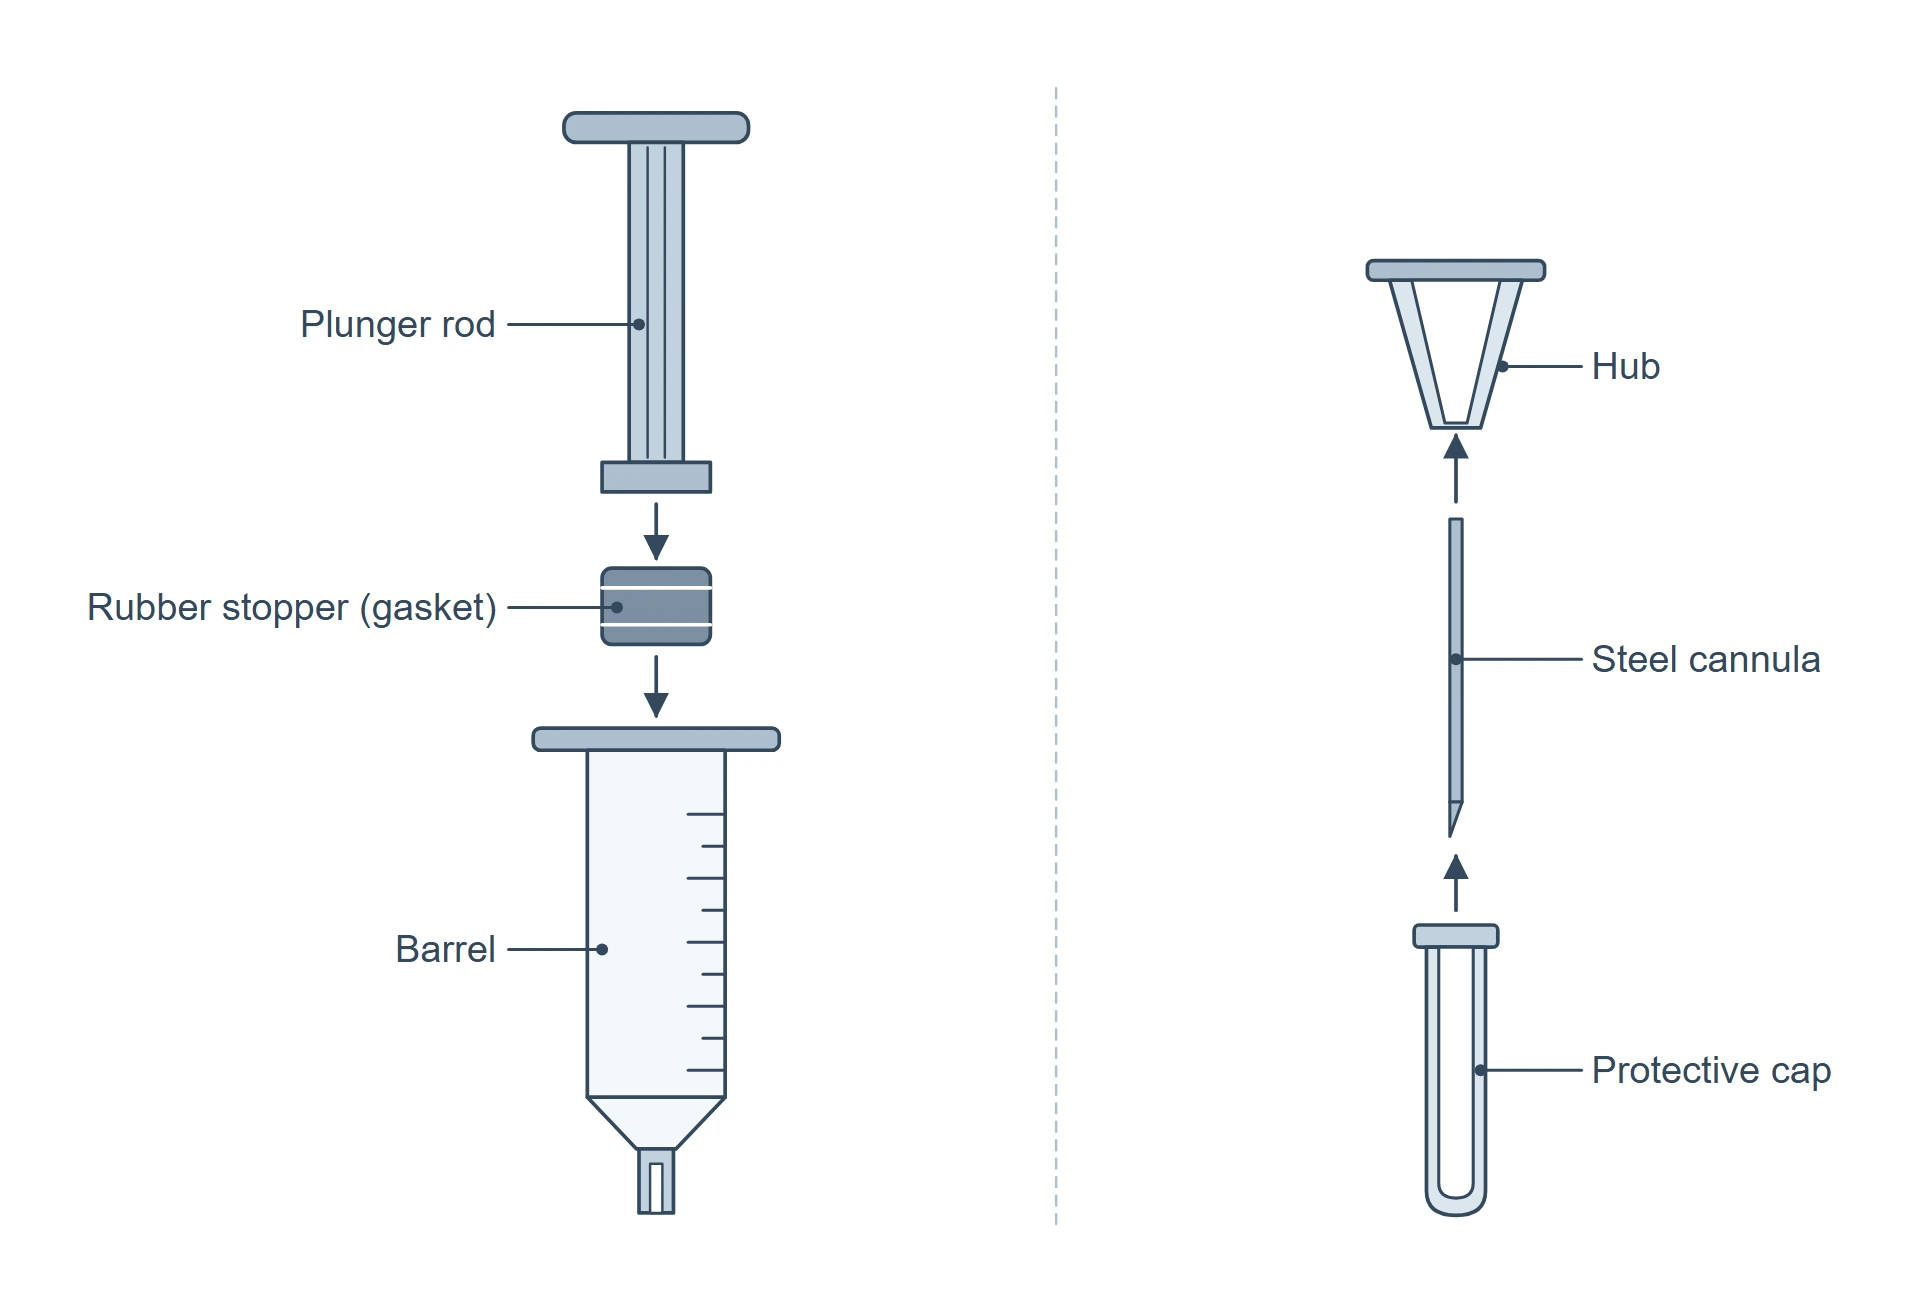
A disposable syringe is three parts, a barrel, a plunger and a rubber gasket, or two parts in the two-part design. An injection needle is a plastic hub, a steel cannula and a protective cap. In the trade the plunger is usually called the plunger rod, and the rubber gasket the rubber stopper (or piston).

Syringe, step by step
1. Feed the parts. The parts are fed into the machine.


2. Turn the turrets together. Several rotary turrets work together and carry the parts through the stations. The machine can handle standard, Luer-lock, two-part and eccentric-tip syringes.


3. Put the parts together. The rubber stopper is fitted to the plunger rod, and the plunger is then inserted into the barrel. A two-part syringe has no separate stopper step. Small syringes run faster, and large sizes run slower, so speed depends on the size.

4. Slide out. Finished syringes slide out along the outfeed chute. A typical machine runs about 10,000 syringes per hour. Where you also need the other syringe machines, the full set covers syringe moulds and injection moulding machines for the barrel and plunger, this assembly machine, a printing machine for the graduation marks, and a packing machine.

Needle, step by step
The needle machine is a different machine from the syringe machine: it assembles injection needles, not syringes, and every needle goes through glue, UV curing and a check. Its typical speed, about 900–1,000 needles per hour, and the syringe machine's, about 10,000 syringes per hour, belong to different jobs and should not be compared.
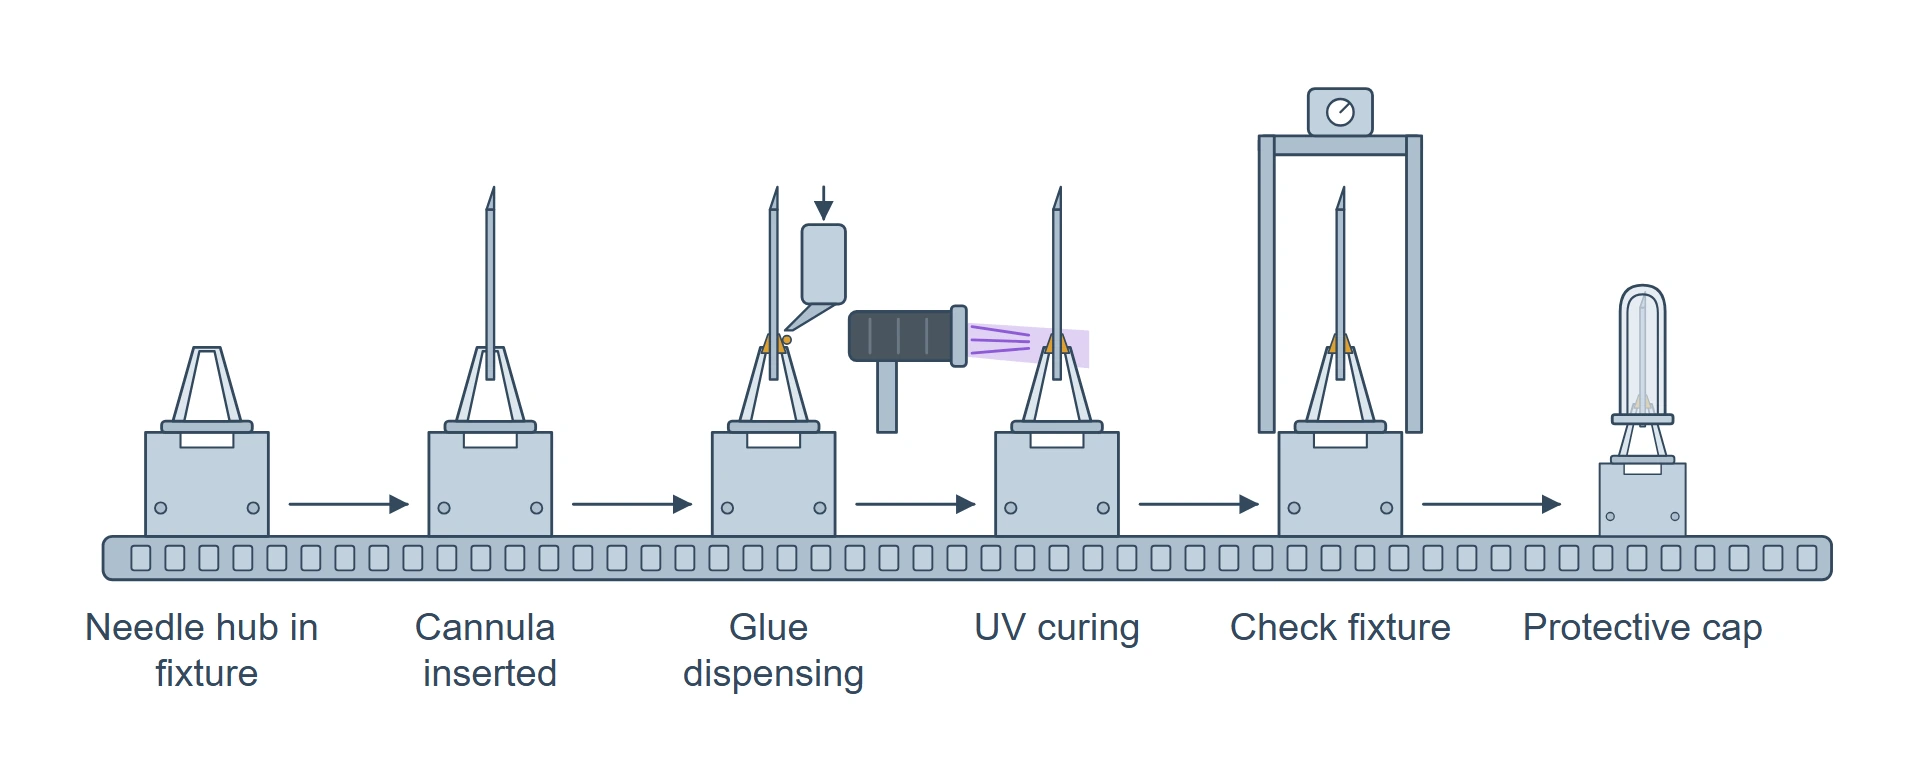
1. Feed the parts. Feeders bring in the hub, the steel cannula and the protective cap.


2. Move station by station. The parts move from station to station on a rotary table. Each station does one job on the needle.
A needle in fixture number 12 moving to the next station on a rotary table. What you will see: a needle held in its numbered fixture moves on to the next station as the rotary table turns.
3. Insert the cannula. The steel cannula is placed into the hub.

4. Dispense the glue. Glue goes on where the cannula meets the hub. This is what holds the steel cannula in the plastic hub, and the glue is a UV-curing adhesive.

5. Cure it under UV light. The glued joint is cured under UV light. In our video the joint glows purple under the lamp.

6. Check each needle. Each finished needle is checked in a fixture. Tell us what each needle needs to be checked for.

7. Fit the protective cap. The protective cap goes on the finished needle.

Catheter parts
The connector goes on a rotary table, and the tube tip is formed by heat. The catheter connector assembly machine works on a rotary table, two connectors at a time, at 60–80 per minute on the standard model, with a vibratory bowl feeding the connectors. Two machines form the tips of medical tubes: the medical tube tipping machine carries the tubes through a row of heated forming heads, six at a time, at 60–80 per minute, and the medical PVC tube end closing machine heat-fuses the tip of PVC tubing with hot-melt heads that press down, six at a time, at 35–45 per minute.
Cleanroom and other medical parts
The cleanroom line is built around a vertical rotary disc and a pin chain conveyor. The disc takes each part and places it onto a pin on the chain conveyor, which carries it on to the next station, with pneumatic pick-and-place and sensors at the transfer points. The stainless steel stations are built for cleanroom use. We also supply a saliva collector assembly machine, 55–60 per minute, two at a time, a urine bag assembly machine, 750–850 bags per hour, and a drug dispenser assembly line. For a pen-style medical product, see insulin pen assembly and testing.
Which machine for which part
| You need | Machine | Output | Layout |
|---|---|---|---|
| Disposable syringes | Syringe Assembly Machine | About 10,000 per hour (typical, depends on size) | Rotary turrets with an outfeed chute |
| Injection needles | Injection Needle Assembly Machine | About 900–1,000 per hour (typical) | Rotary table, glue dispensing, UV curing |
| Catheter connectors | Catheter Connector Assembly Machine | 60–80 per minute, two at a time (standard model) | Rotary table |
| Heat-formed tube tips | Catheter & Medical Tube Tipping Machine | 60–80 per minute, six at a time (standard model) | Precision pallet conveyor |
| Heat-fused PVC tube ends | Medical PVC Tube End Closing Machine | 35–45 per minute, six at a time (standard model) | Rotary table |
| Small plastic medical parts in a cleanroom | Cleanroom Medical Device Assembly Line | Set by your parts and output | Vertical rotary disc feeding a pin chain conveyor |
The machines at work
Video 2: a needle assembly machine. What you will see: glue goes onto the needle hub, cures under UV light, then the needle is checked.
Video 3: a catheter connector assembly machine. What you will see: grippers pick and place blue connectors on a rotary table, fed from a vibratory bowl.
Video 4: a medical tube tipping machine. What you will see: thin blue tubes ride carriers through a row of tip-forming heads to an outfeed belt.
Video 5: a PVC tube end closing machine. What you will see: a rotary table carries rows of blue tubes under hot-melt heads that press down.
Video 6: a cleanroom medical assembly line. What you will see: a vertical rotary disc places small clear parts onto pins on the chain conveyor.